Ringside adds a power dialler with live AI coaching to HubSpot: click-to-call from any contact record, live transcription and prompts while you talk, and the call logged to the contact when you hang up. This guide runs in the order the product works, starting in HubSpot rather than with a Ringside sign-up. Allow about ten minutes, and keep your phone to hand: Ringside rings it during setup and on every call.
Before you start
- A HubSpot account where you can install apps (Super Admin, or App Marketplace permissions).
- A phone that can take calls and receive a text or a voice call with a code. Ringside rings your phone first and bridges the prospect in, so any handset works and there is no headset setup.
- No Ringside account. Authorising the install creates the account. Before your first call, the dashboard asks how you want to pay: a plan, or pay as you go from $10 of call credit. On a new account, the first top-up also starts a free 7-day trial at plan rates.
Production, a test account, or the demo
There are three places you can try Ringside, and they behave differently. Pick the one that matches what you want to check.
Installing in your production portal
This is the flow the rest of the guide describes. Ringside is installed as a calling provider in the portal you choose on the consent screen, every call is a real phone call over the public network, and every logged call lands on a real contact's timeline. Calls on the trial are real calls, paid from your call credit.
Installing in a HubSpot developer test account or sandbox
A developer test account or a sandbox portal installs exactly like production. The consent screen, the account creation, the welcome steps and the trial are the same, and calls are still real calls paid from your call credit, so dial a number you control rather than a seeded contact. Contacts in a test account are test data, which makes it the right place to check what the logged call looks like on the timeline before rolling Ringside out to a team. Uninstalling from the test account and installing again later issues a fresh install.
The Ringside demo app
The demo at ringside-demo.fly.dev/widget is the calling panel running on its own, without HubSpot, an account or a phone. It provisions a demo organisation and one seeded contact on first load, and the call it places is simulated: no phone rings, and the transcript and coaching feed are scripted so you can see the layout and timing of the live call view. It cannot complete a HubSpot install, because it has no HubSpot credentials, and demo data is wiped when the demo machine restarts. Treat it as a tour of the panel, not as a test of the integration.
Step 1: Install Ringside in HubSpot
Start from the Install in HubSpot button on the Ringside for HubSpot page, or from the Ringside listing in the HubSpot App Marketplace. Either one opens HubSpot's consent screen, where you choose which portal to install into.
The consent screen lists what Ringside asks for. Required: read and write on contacts (to load who you are calling and log the call back) and read on lists (to dial through your HubSpot lists). Optional, and the install works without them: read on companies (to associate the logged call with the contact's company) and read on the emails logged on the contact (HubSpot's sales email scope), so the pre-call brief and the coach can use the email thread alongside the calls, meetings and notes they already read.
Authorise, and Ringside is installed in that portal as a calling provider. It appears in the call picker on a contact record and in HubSpot's call remote, so you can dial from anywhere in HubSpot.
Step 2: Your Ringside account
Authorising does two things at once: it puts the app in your portal, and it creates a Ringside account for the HubSpot user who authorised, under that user's email address. What you see next depends on whether that email already has a Ringside account.
New to Ringside
You are signed in automatically and land on the welcome screen described in step 3. Ringside also emails you, subject "Your Ringside account is ready", with a link back to the same screen. The portal is already connected to your new workspace; there is nothing to confirm.
Already have a Ringside account
Ringside sends you to sign in, with your email filled in. After sign-in, a Connect HubSpot screen names the portal (domain and ID) and the workspace it is about to connect. Check both and press the connect button. If that portal is already connected to a different Ringside workspace, the screen says so before you move it. The install link on this screen can be used once and expires after 24 hours; if it has expired, connect from the dashboard instead (below).
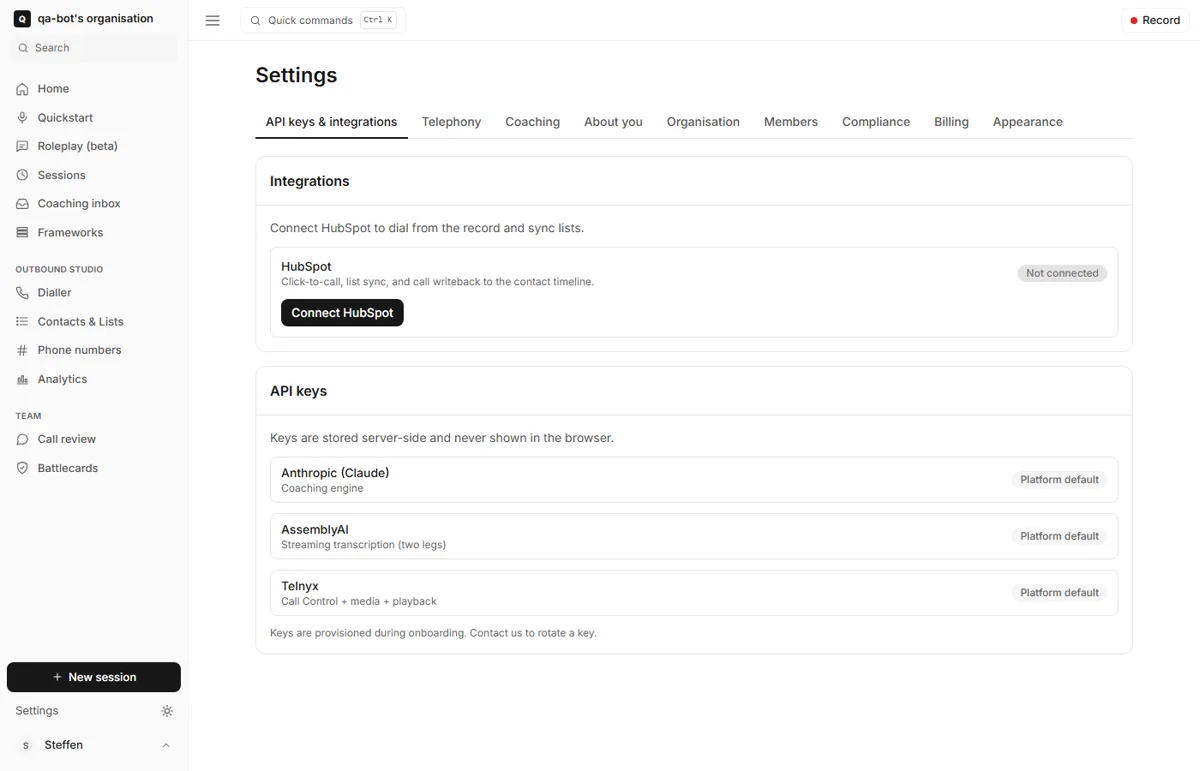
Sign in at app.ringsidecoach.com and open Settings, Integrations, Connect HubSpot. This runs the same HubSpot authorisation and attaches the portal to the workspace you are signed into. Use it when the install link has expired, or when you want the portal on an existing workspace rather than the one created at install. A workspace holds one portal, so connecting a second portal replaces the first.
Step 3: The welcome steps
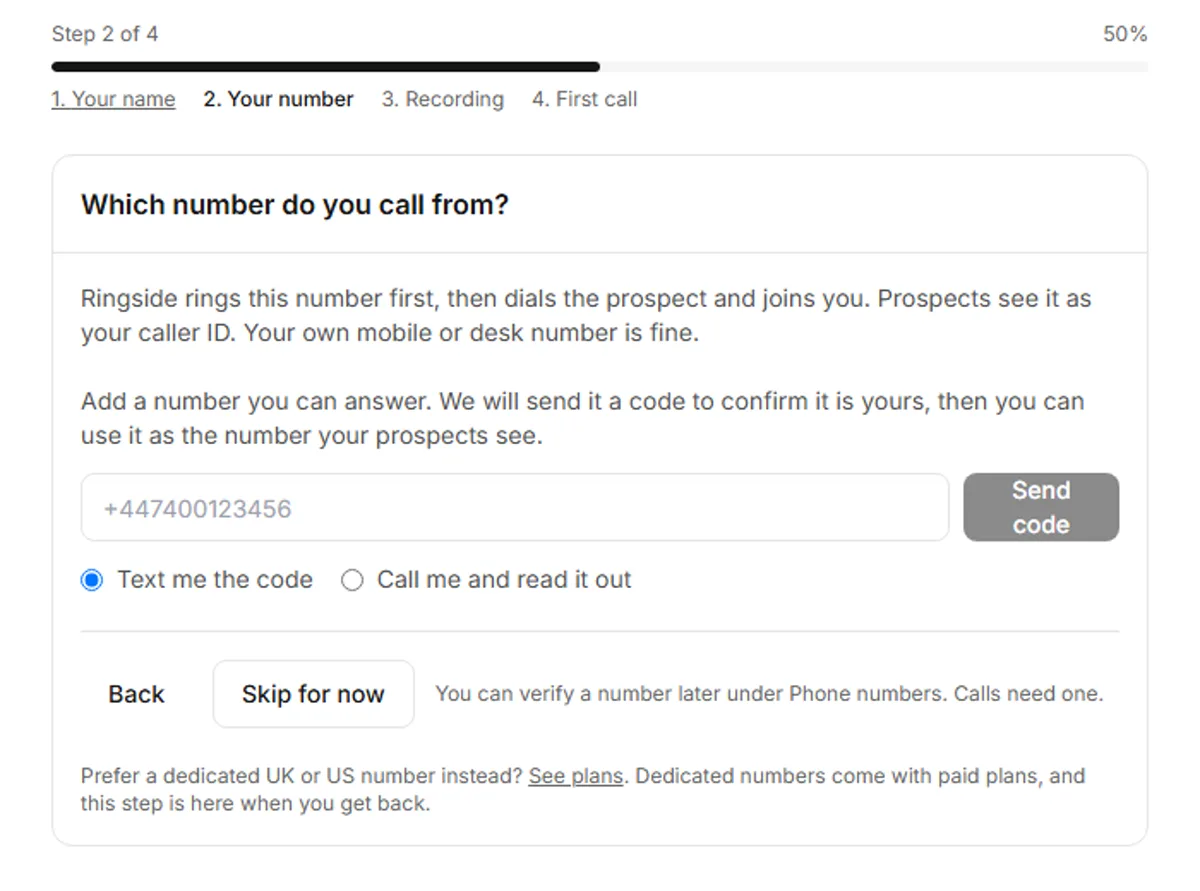
A new account opens on a four-step welcome screen: your name, your number, recording, first call. Every step can be skipped and revisited, and the dashboard's Skip to the app link is always there.
- 1Your name. How you appear in the workspace.
- 2Your number. The phone Ringside rings first on every call. Enter it in international format, choose to receive the code by text or by a voice call, and enter the code. Once verified, the number also becomes the caller ID prospects see. You can skip this and verify later, but a call cannot start without a verified number.
- 3Recording. Recording is off and transcription is on. Ringside transcribes the call live for coaching and logging without recording audio; an admin can turn recording on later under Settings, Calling. The step links to a by-country summary of call recording consent.
- 4First call. A walkthrough of the five moves in step 6: open a contact, click Call and pick Ringside, answer your phone, watch the coaching, hang up and pick the outcome.
Step 4: A plan, or pay as you go
Before your first call, the dashboard asks how you want to pay for calls. A plan is the default: it adds call credit for your account every month, and calls on a plan cost $0.20 a minute with live coaching, or $0.10 as a power dialler only. Or pay as you go with no subscription: add call credit from $10, and calls cost $0.60 a minute with live coaching, or $0.30 as a power dialler only. On a new account, your first top-up also starts a free 7-day trial at plan rates, one trial per card. Calls are charged per started minute from call credit, at the prices on the pricing page, and credit expires 12 months after purchase. When the trial ends, calls carry on at pay-as-you-go prices from your remaining call credit, or pick a plan to keep plan prices. When credit runs low, add more under Settings, Billing on the dashboard. Plans are per seat, in USD, monthly or annual. To pick or change a plan, open Settings, Billing on the dashboard (a workspace admin sees this tab). The same tab shows the current plan and renewal date.
Step 5: Numbers
Ringside uses two numbers on every call, and on the trial they are usually the same one.
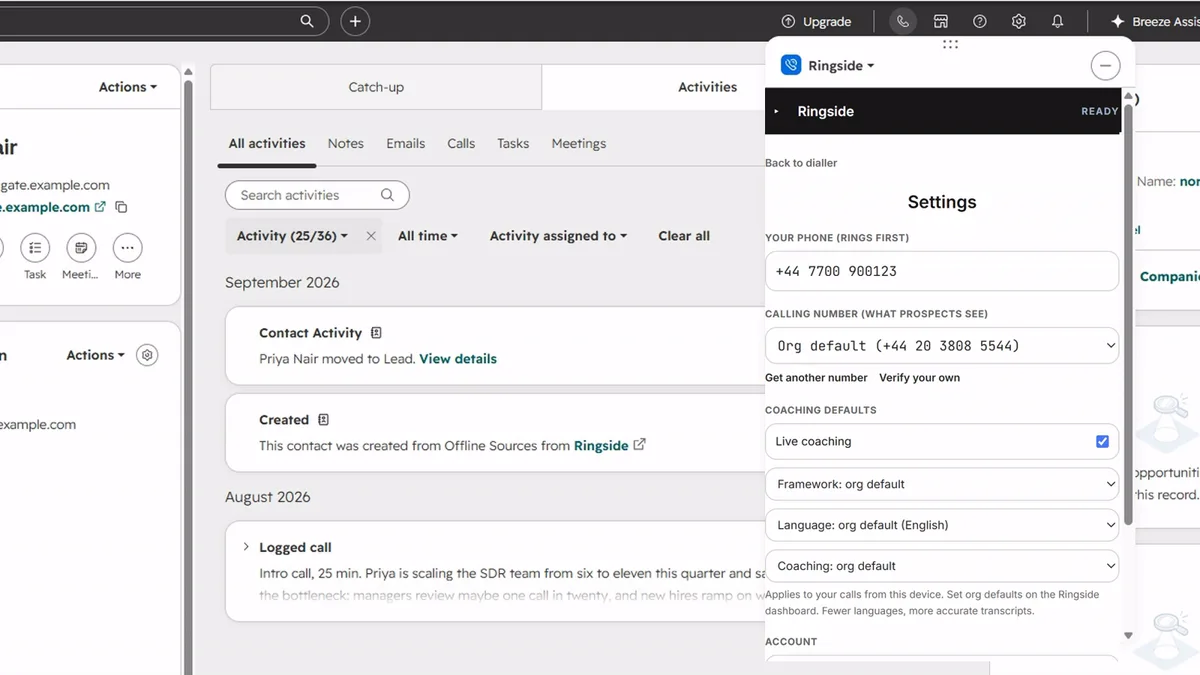
- The phone Ringside rings first. Your own mobile or desk phone. Set it on the welcome screen, or in the panel's settings under Your phone (rings first). Change it any time.
- The caller ID prospects see. A number you have proved you control, or a dedicated number bought through Ringside. The first usable number becomes the workspace default; change the default on the dashboard under Settings, Calling.
Verify a number you own
On the welcome screen, in the panel's settings under Calling number, Verify your own, or on the dashboard under Settings, Calling: enter the number, receive a code by text or voice call, enter the code. Ringside remembers who verified a number, so a rep who proves control of a number once can use it in any workspace they belong to.
Buy a dedicated number (paid plans)
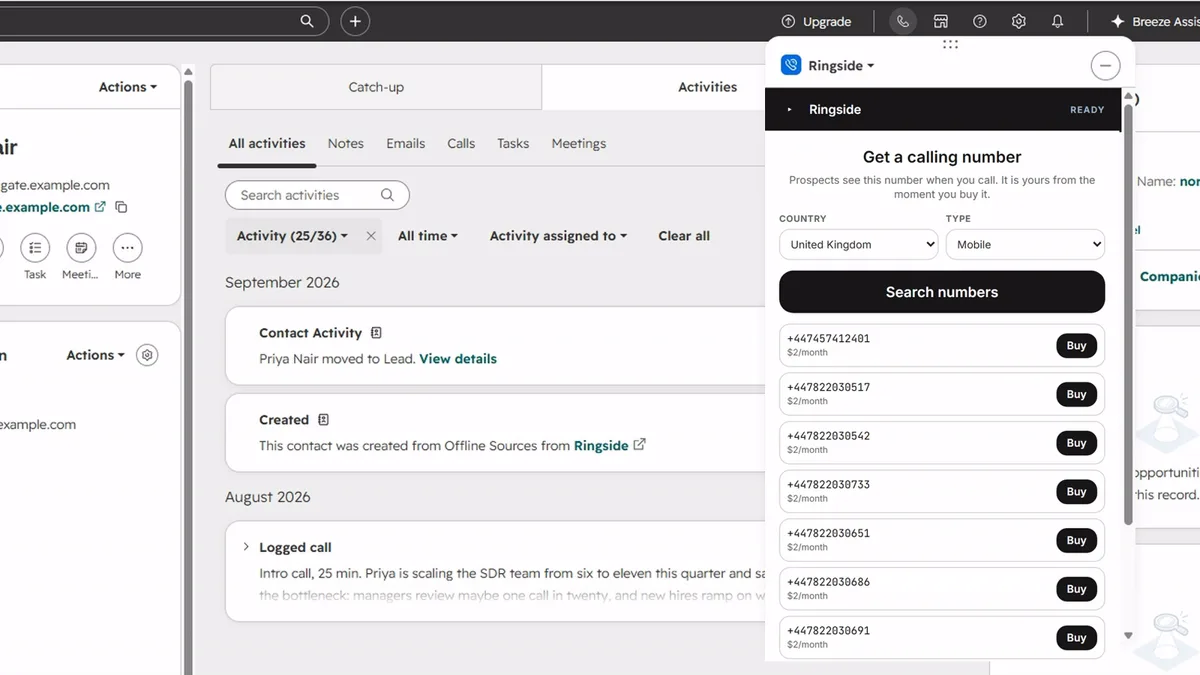
In the panel's settings choose Get a number, pick a country (UK or US) and a type (mobile or local), search, and confirm. The number is usable straight away, becomes the default if it is the first, and is one per workspace. Buying needs a paid plan. On the trial the panel still offers Get a number but declines the purchase with "Buying a number needs a paid plan. On the free trial, verify a number you already own instead."
Step 6: Make your first call
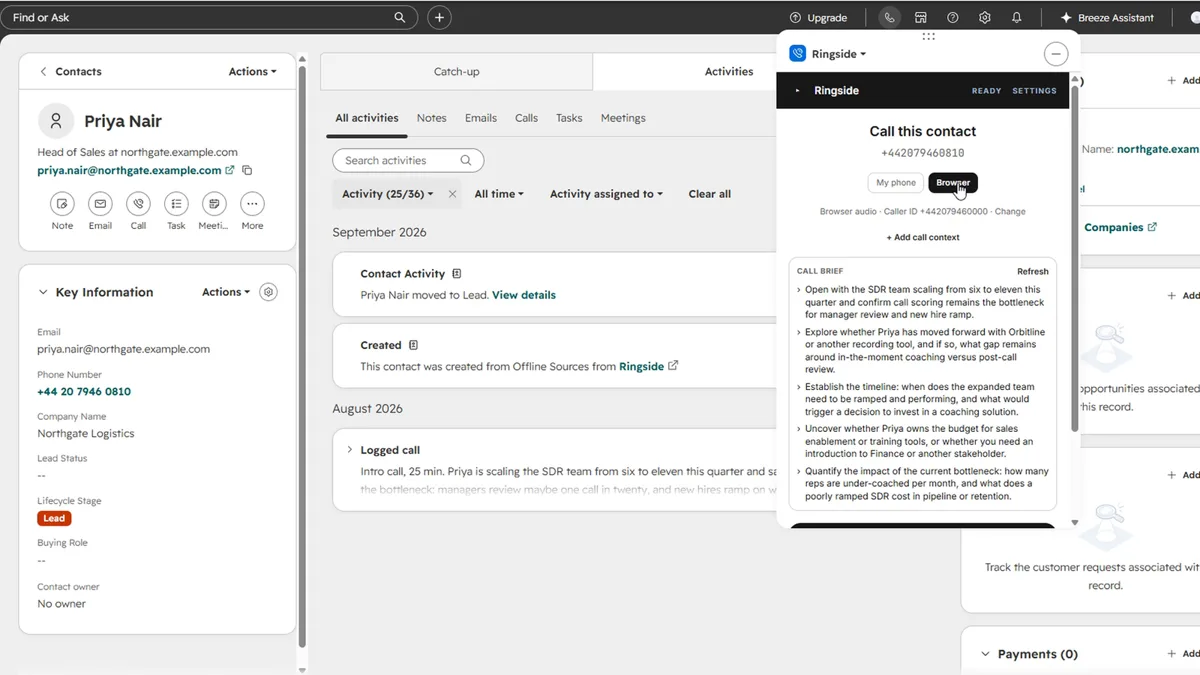
Open a contact with a phone number and click Call. The first time, HubSpot asks which calling provider to use; pick Ringside and it stays picked. The Ringside panel opens with the contact's name, number, company and job title from the record.
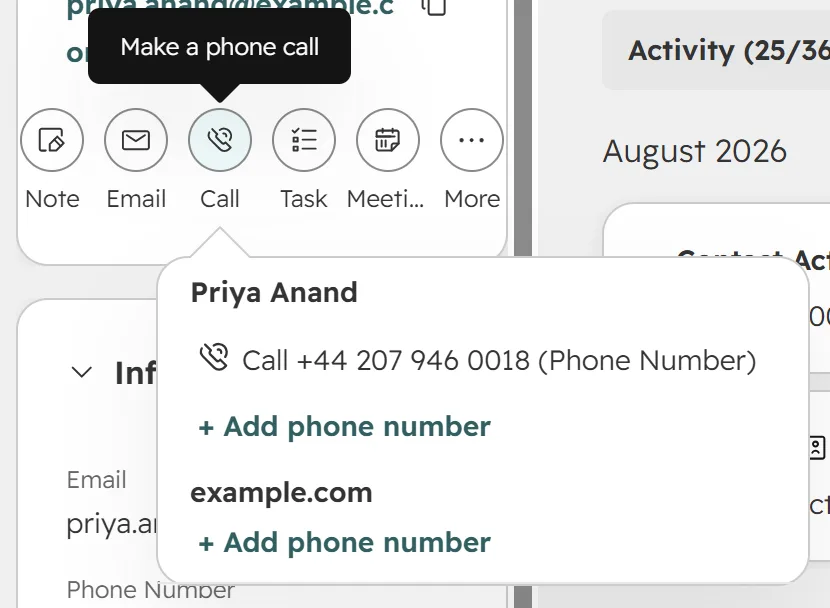
The panel also loads in HubSpot's call remote, the phone icon in the top bar. From there the button reads Place a call and you enter the number by hand; from a record it reads Call this contact. Both start the same call.
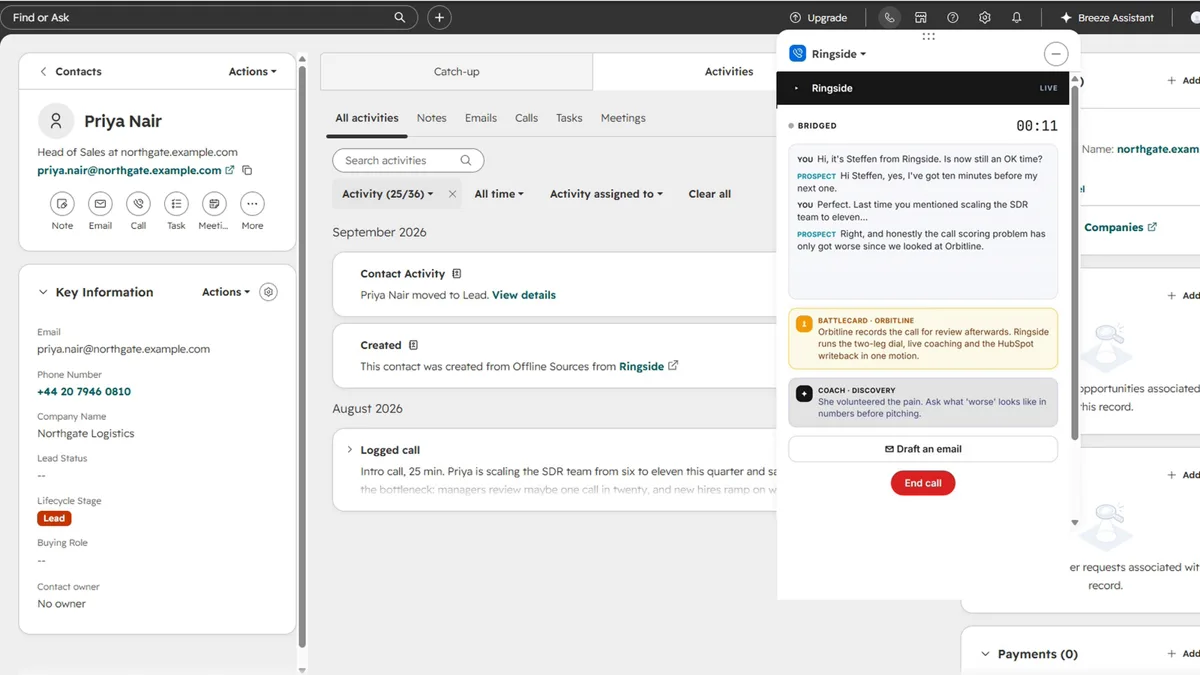
Press the button and your phone rings first. Answer it, and the prospect is dialled while you hear a ringback. As you talk, the panel shows the live transcript and the coach's prompts against your chosen framework: the areas you have not covered yet, an objection prompt when one comes up, a nudge when you have been talking too long. You can move around HubSpot mid-call; the call lives on the phones, and the panel re-attaches to it when it reloads.
HubSpot's calling remote only hands a call to the provider from the tab you are looking at. If you click Call in a tab that is in the background (for example, from a second window), nothing happens and no error is shown. Bring the tab to the front and click again.
Step 7: Wrap up and log the call
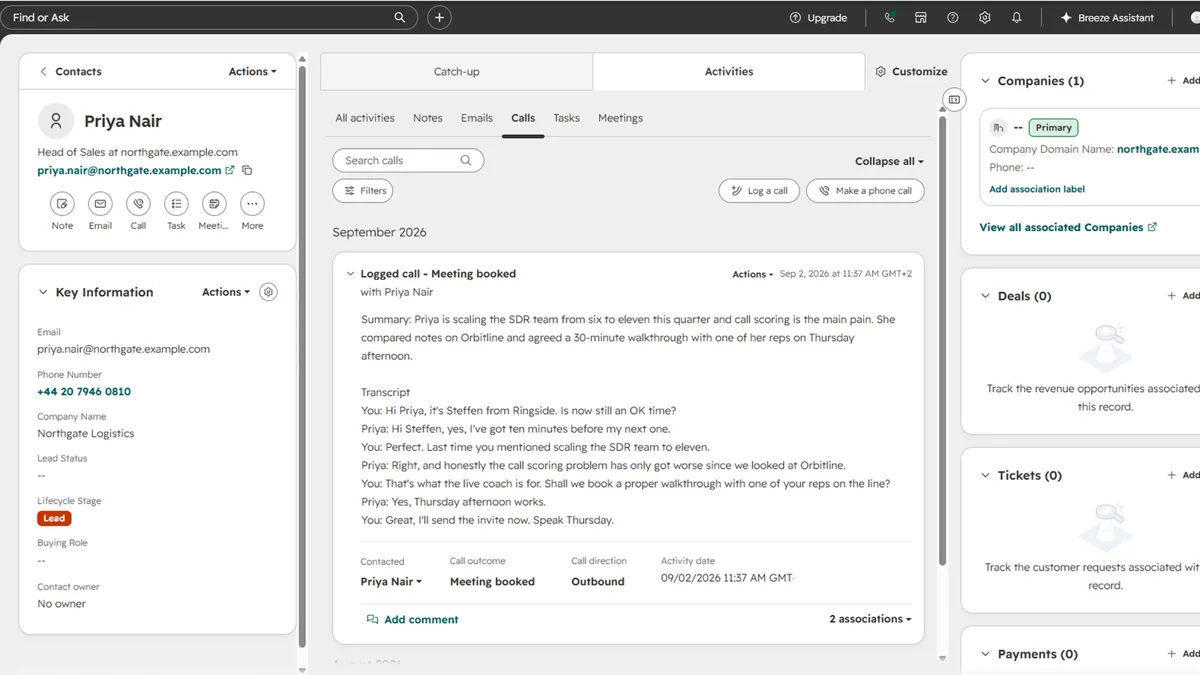
When the call ends, the panel moves to wrap-up. Pick an outcome from your portal's own disposition list (Connected, Left voicemail, No answer, and so on), add notes if you want them, and press Log call. The call is created on the contact's HubSpot timeline with the outcome, the AI summary, action items, the full transcript and the talk time. If your organisation has recording on, the logged call links to the recording on Ringside's review page.
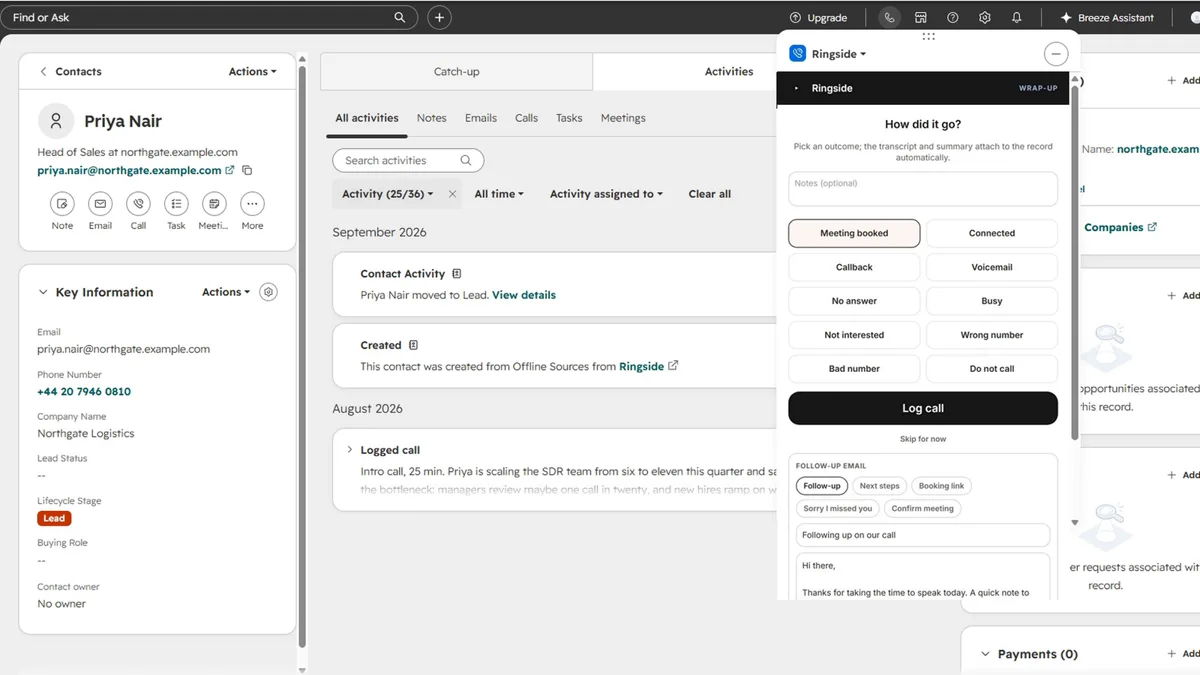
Wrap-up also offers Draft follow-up email. Ringside drafts a subject and body from the conversation and the agreed next steps; edit them in the panel and press Copy email to paste into your own mail client. Ringside does not send email on your behalf.
Beyond the first call
Dial through a HubSpot list
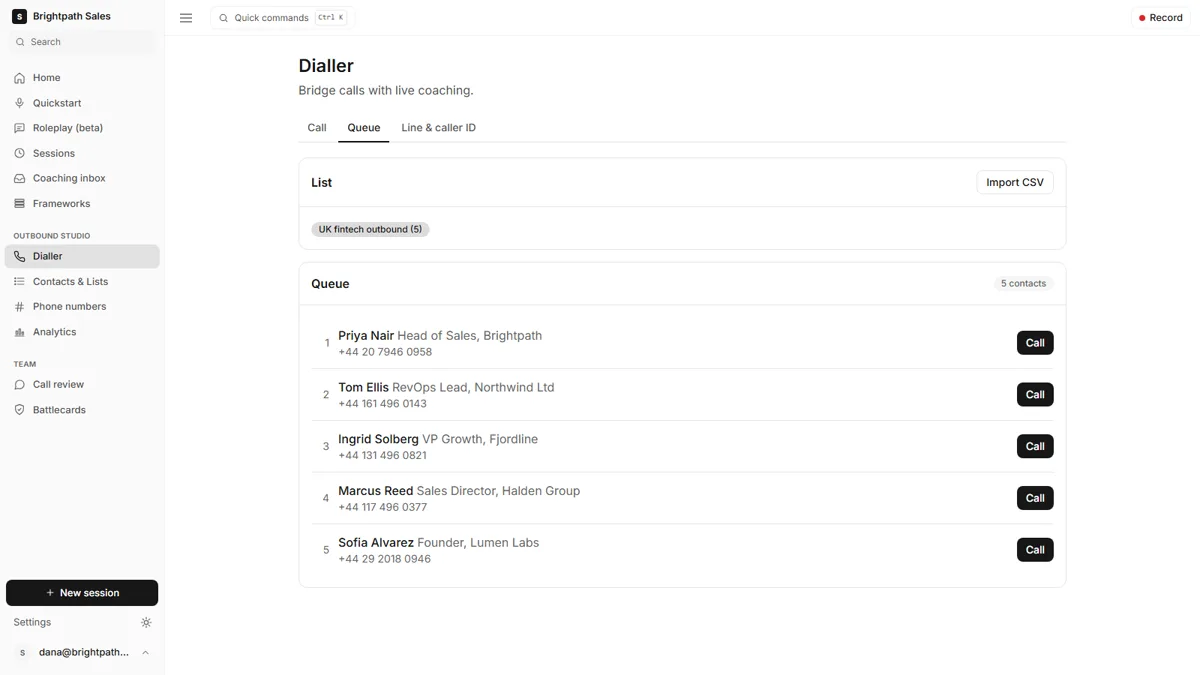
On the Ringside dashboard, Contacts & Lists, Import from HubSpot pulls a HubSpot list or active segment in as a dial queue. Open it in the Dialler and Ringside dials one prospect after another, keeping your phone on the line between calls, with the same wrap-up and logging on every attempt. See the power dialler guide for how a session runs.
Take the call in the browser
From the dashboard's dialler, the Take the call in setting switches the rep leg from your phone to the browser, using your computer's microphone and speakers. Everything else about the call is the same. Inside HubSpot the panel has the same switch, My phone or Browser; Browser opens a small calling window for the audio, so allow pop-ups for the page.
Review a call
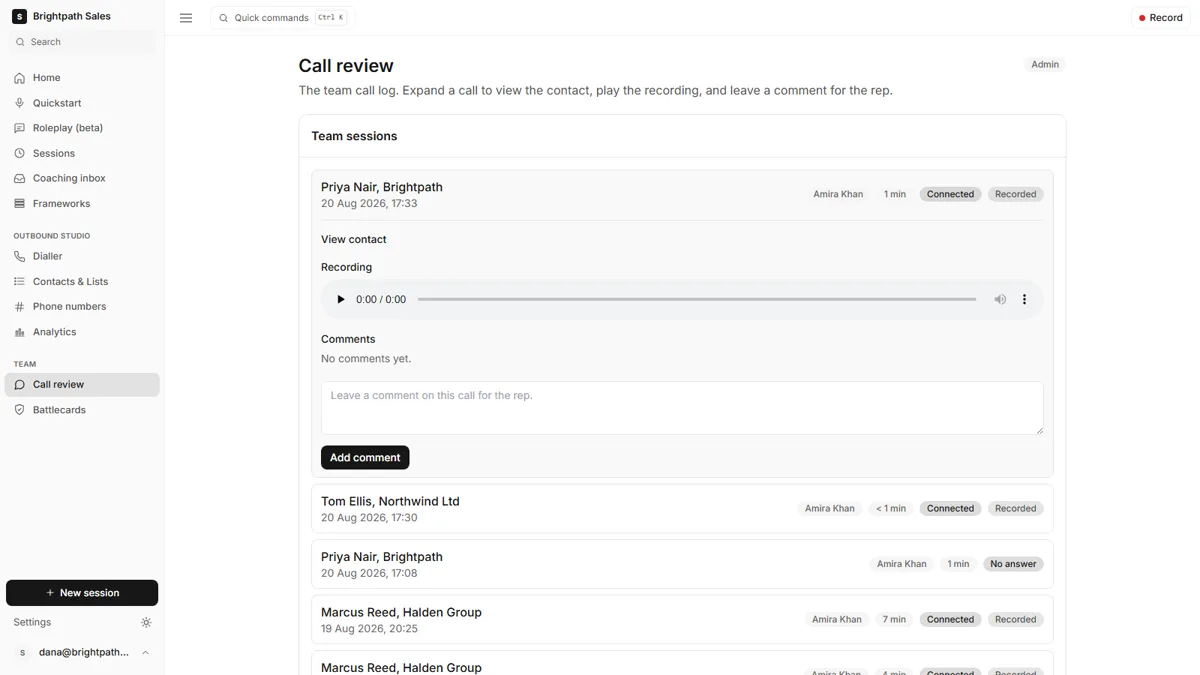
Every call has a page under Call review on the dashboard: the transcript, the framework scorecard, and the recording when recording is on. The Sessions page holds the AI summary and score for each call. Managers use the same pages, plus Analytics, to review a team.
Compliance defaults
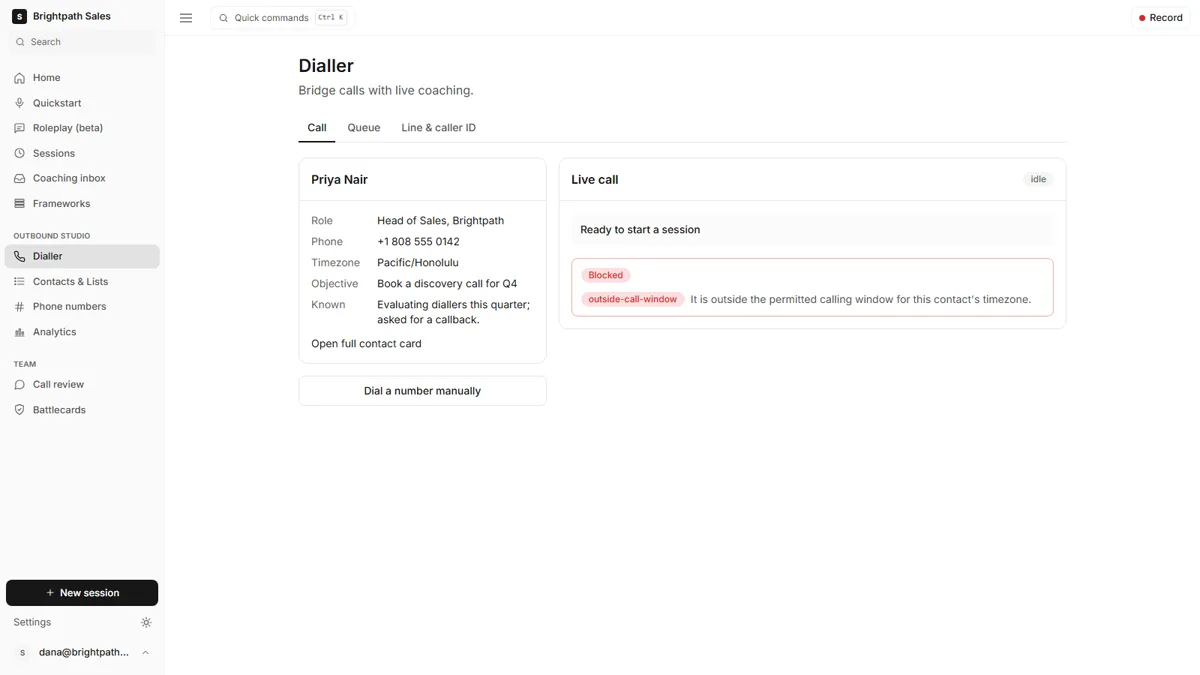
Before every dial, Ringside checks the contact against your do-not-call list and against calling hours in the contact's timezone (a contact with no known timezone is never blocked). A blocked contact is skipped in a queue and refused from the panel, with the reason shown. Recording is off until an admin turns it on under Settings, Calling; giving notice to the people you call stays with you, and call recording consent summarises the rules by country.
If something does not work
- The panel asks you to sign in. The panel runs on its own origin, so it signs in through the dashboard: press Continue with Ringside, which opens the dashboard in a new window, then brings you straight back. There is also an email and password form under it.
- "No caller ID set. Get a calling number below, or verify one you already own." The workspace has no verified number yet. Verify yours from the panel's settings or the welcome screen.
- "Your 7-day free trial has ended" or "You have used your plan's talk time". Pick a plan or add call credit under Settings, Billing on the dashboard.
- Nothing happens when you click Call. The HubSpot tab was in the background. Bring it to the front and click again.
- "Install link expired" on the Connect HubSpot screen. The one-time link was used or is older than 24 hours. Sign in and connect from Settings, Integrations instead.
- The logged call is missing from the timeline. Logging happens when you press Log call in wrap-up, not on hangup. The Sessions page on the dashboard shows each call's writeback status and a retry.
Uninstall
Remove Ringside from HubSpot's Connected apps page. Ringside loses access immediately. Calls already logged stay on the timeline, because they are ordinary HubSpot call engagements. To connect the portal again later, install from the marketplace or from Settings, Integrations.
Start at the Ringside for HubSpot page, authorise the portal, verify your number on the welcome screen, and make the first coached call about ten minutes later.
Frequently asked questions
Do I need a Ringside account before I install?
No. Authorising the install creates the account under the email of the HubSpot user who authorised and connects the portal to it. If that email already has a Ringside account, you sign in and confirm the connection instead.
Is a card needed for the trial?
Yes. The 7-day trial starts with your first call credit top-up, from $10, which then pays for your calls and expires 12 months after purchase. After the trial, pick a plan or keep paying as you go from your call credit, under Settings, Billing on the dashboard.
What number do prospects see when I call?
Your workspace's default calling number: the number you verified as your own, or a dedicated number bought on a paid plan. Change the default on the dashboard under Settings, Calling.
Does Ringside work from my mobile?
Yes. By default the call happens on your phone and the panel is only the control. Both the panel and the dashboard can switch to Browser instead, using your computer's microphone and speakers. From the dashboard you can also dial from a phone browser and talk on the same device.
Where do recordings and transcripts end up?
The transcript, outcome, summary and action items are written onto the HubSpot contact's timeline as a logged call. Recordings, when recording is on, play on the dashboard's review page, which the logged call links to.
Can I test in a sandbox first?
Yes. A HubSpot developer test account or sandbox installs exactly like production, with the same trial. Calls are still real calls, so dial a number you control.
How do I uninstall?
Remove the app from HubSpot's Connected apps page. Ringside stops having access immediately; your logged calls stay on the HubSpot timeline because they are normal HubSpot call engagements.